Embarking on a home improvement projection can be both stir and reinforce, particularly when it comes to enhancing the artistic and functionality of your living space. One democratic DIY project that has gained substantial grip is the installation of DIY wood shutters. These versatile window treatments not only add a touch of elegance to your home but also provide virtual benefits such as light control, privacy, and insularity. Whether you're a temper DIY enthusiast or a novice looking to tackle a new task, establish DIY wood shutters can be a fulfill enterprise.
Understanding DIY Wood Shutters
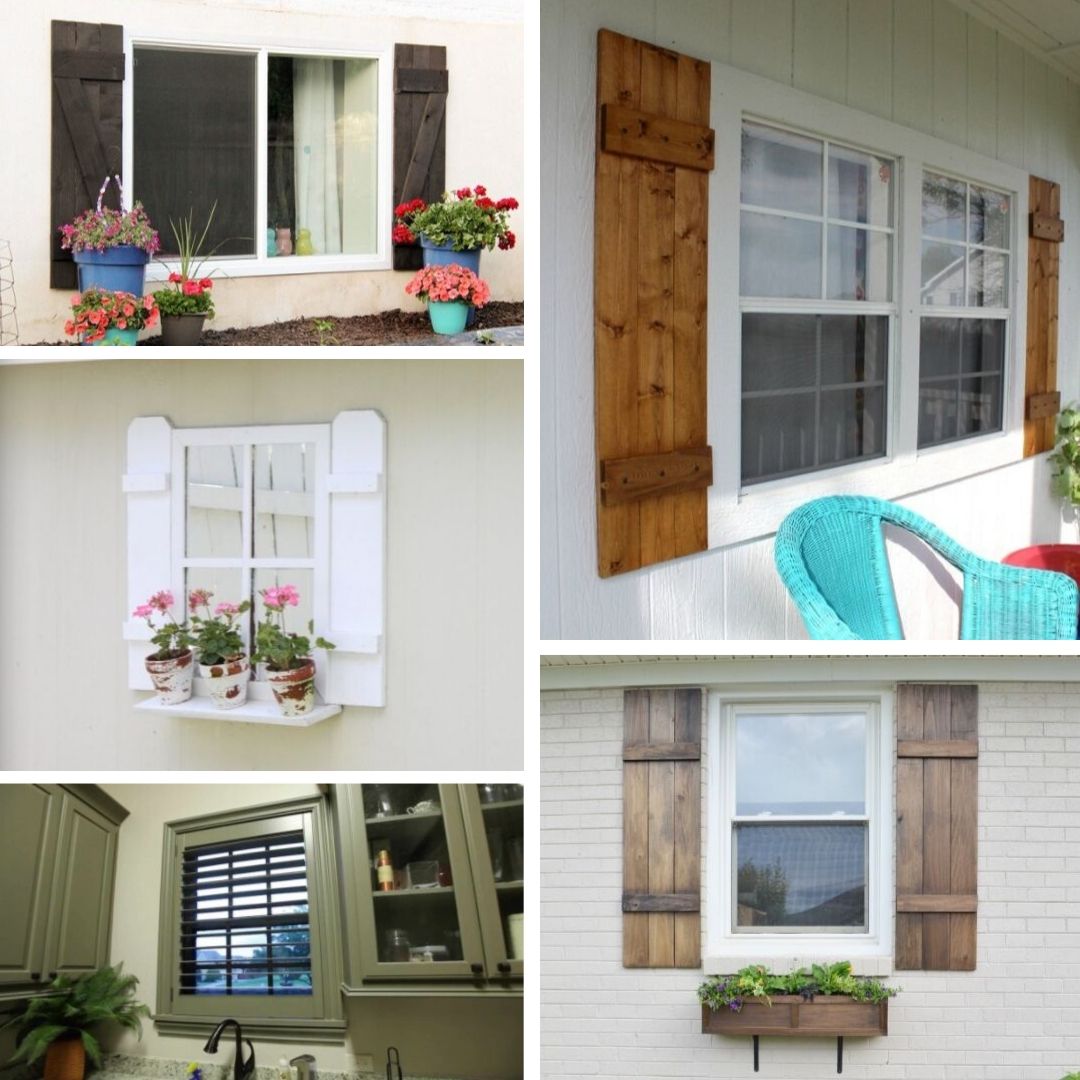
DIY wood shutters are a classic choice for window coverings, proffer a dateless appeal that complements various interior design styles. Unlike other window treatments, wood shutters are known for their durability and seniority. They are typically made from high quality materials such as basswood, poplar, or composite woods, ensuring they can withstand the test of time.
One of the key advantages of DIY wood shutters is their customizability. You can choose from a variety of styles, colors, and finishes to match your home's decor. Whether you prefer a traditional look with elevate panels or a more mod design with flat panels, there are numerous options to suit your taste. Additionally, wood shutters can be paint or stained to reach the hope aesthetical, making them a versatile choice for any room.
Benefits of DIY Wood Shutters
Installing DIY wood shutters offers several benefits that make them a worthwhile investment:
- Light Control: Wood shutters allow you to adjust the amount of light recruit your room with ease. The adjustable louvers can be shift to control the light flow, providing tractability throughout the day.
- Privacy: Shutters offer fantabulous privacy control. You can close the louvers wholly to block out unwanted views or adjust them to allow for some light while maintain privacy.
- Insulation: Wood shutters provide an extra layer of insularity, helping to determine the temperature in your home. This can guide to energy savings by trim the need for heating or chill.
- Aesthetic Appeal: The natural beauty of wood shutters adds a touch of elegance to any room. They can enhance the overall esthetical of your home, create it more inviting and stylish.
- Durability: Wood shutters are built to last. With proper care and maintenance, they can withstand daily use and retain their appearance for many years.
Types of DIY Wood Shutters
When choosing DIY wood shutters, it's essential to read the different types available. Each type has its unique features and benefits, catering to various preferences and needs.
Plantation Shutters: These are the most democratic type of wood shutters, characterized by their all-embracing louvers. Plantation shutters are ideal for larger windows and ply excellent light control and privacy. They are available in diverse materials, including wood, composite, and vinyl.
Café Shutters: Café shutters extend only the lower half of the window, allow natural light to enter the speed portion. They are perfect for kitchens and boom areas where you want to maintain a bright and airy atmosphere while enjoying privacy.
Full Height Shutters: These shutters cover the entire window, ply complete light control and privacy. They are suitable for bedrooms, bathrooms, and go rooms where you need maximum privacy and light management.
Tier on Tier Shutters: Tier on tier shutters consist of two sets of shutters, one on top of the other. This design allows you to operate the speed and lower shutters severally, proffer tractability in light control and privacy.
Materials for DIY Wood Shutters
DIY wood shutters can be made from respective materials, each with its unique characteristics. Choosing the right material depends on your preferences, budget, and the specific requirements of your projection.
Basswood: Basswood is a democratic choice for DIY wood shutters due to its lightweight and undestroyable nature. It is easy to act with and can be painted or stain to achieve the desired finish. Basswood shutters are known for their smooth surface and excellent insulation properties.
Poplar: Poplar is another commonly used material for wood shutters. It is somewhat heavier than basswood but offers a more racy and sturdy construction. Poplar shutters are idealistic for larger windows and can be stained or painted to match your decor.
Composite Woods: Composite woods are direct materials made from a combination of wood fibers and resins. They are highly undestroyable, tolerant to heave and fading, and demand minimal maintenance. Composite wood shutters are an excellent choice for humid environments, such as bathrooms and kitchens.
Vinyl: Vinyl shutters are a cost effectual alternate to wood shutters. They are lightweight, easy to install, and uncommitted in a variety of colors and finishes. Vinyl shutters are resistant to wet and fading, make them worthy for eminent humidity areas.
Installing DIY Wood Shutters
Installing DIY wood shutters can be a rewarding undertaking, but it requires careful design and performance. Here is a step by step guide to assist you through the process:
Tools and Materials Needed
- DIY wood shutters
- Tape quantify
- Pencil
- Level
- Drill
- Screwdriver
- Screws
- Anchors (if involve)
- Caulk
- Paint or stain (optional)
- Paintbrush or roller (optional)
Step by Step Installation Guide
Step 1: Measure Your Windows
Accurate measurements are crucial for a successful installation. Use a tape mensurate to determine the width and height of your windows. Measure from the inside of the window frame to ensure a precise fit.
Step 2: Order Your Shutters
Once you have the measurements, order your DIY wood shutters from a reputable supplier. Make sure to specify the type, material, and finish you prefer.
Step 3: Prepare the Window Frame
Clean the window frame to remove any dirt or debris. Use a tier to insure the frame is straight and get any necessary adjustments. If the frame is not level, you may need to use shims to make a stable surface for the shutters.
Step 4: Install the Shutter Frame
Position the shutter frame against the window frame and use a level to see it is straight. Mark the screw holes and drill pilot holes. Insert screws or anchors (if needed) to secure the frame in rate. Make sure the frame is flush with the window frame for a unlined appear.
Step 5: Attach the Shutters
Insert the shutters into the frame and secure them with screws or hinges, bet on the design. Ensure the shutters are properly aligned and can open and close smoothly.
Step 6: Finish the Edges
Apply caulk around the edges of the shutter frame to seal any gaps and prevent drafts. This step is indispensable for control the shutters provide optimal insulation and light control.
Step 7: Paint or Stain (Optional)
If you prefer a custom finish, you can paint or stain the shutters to match your decor. Use a paintbrush or roller to apply the paint or stain equally, and grant it to dry wholly before treat the shutters.
Note: Always follow the manufacturer's instructions for paint or stain to insure the best results.
Maintaining Your DIY Wood Shutters
Maintaining your DIY wood shutters is all-important for prolonging their lifespan and keeping them looking their best. Regular pick and care will aid prevent damage and ensure they keep to function right.
Cleaning: Dust your shutters regularly using a soft cloth or duster. For deeper cleaning, use a mild soap and h2o solution to wipe down the shutters. Avoid using harsh chemicals or scratchy materials that can damage the finish.
Inspection: Periodically inspect your shutters for any signs of wear or damage. Check the hinges, screws, and louvers to ensure they are in full precondition. Tighten any loose screws and replace any damage parts as ask.
Repairing: If you notice any scratches or dents, you can repair them using wood filler or touch up paint. For more significant damage, see consulting a professional for repairs.
Protection: Protect your shutters from direct sunlight and moisture to prevent evanesce and heave. Use curtains or blinds in conjunction with your shutters to provide extra security.
Note: Avoid exposing your shutters to extreme temperatures or humidity, as this can cause warping and other damage.
DIY Wood Shutters vs. Other Window Treatments
When considering window treatments, it's indispensable to weigh the pros and cons of different options. DIY wood shutters offer various advantages over other popular choices, such as curtains, blinds, and shades.
| Window Treatment | Pros | Cons |
|---|---|---|
| DIY Wood Shutters | Durable, customizable, excellent light control, privacy, and insulation | More expensive, require professional induction |
| Curtains | Affordable, variety of styles and colors, easy to install | Less indestructible, limited light control, can be bulky |
| Blinds | Affordable, easy to install, full light control | Less durable, limited privacy, can be noisy |
| Shades | Affordable, variety of styles and colors, easy to install | Less durable, limited light control, can be difficult to clean |
While DIY wood shutters may be more expensive than other options, their durability, customizability, and hard-nosed benefits get them a worthwhile investment. They proffer victor light control, privacy, and insulation, enhance the overall comfort and aesthetic of your home.
besides their functional benefits, DIY wood shutters add a touch of elegance and sophistication to any room. Their natural beauty and dateless appeal make them a popular choice for homeowners looking to elevate their doi design.
When comparing DIY wood shutters to other window treatments, it's open that they offer a unique combination of style, functionality, and durability. While they may ask a higher initial investment, their long term benefits and aesthetic appeal get them a valuable add-on to any home.
DIY wood shutters are a versatile and virtual choice for window coverings, offer a range of benefits that enhance both the functionality and aesthetic of your dwell space. Whether you're looking to improve light control, privacy, or insulation, wood shutters render an refined and durable solution. By understanding the different types, materials, and installation processes, you can create an inform conclusion and enjoy the many advantages of DIY wood shutters in your home.
From their dateless appeal to their practical benefits, DIY wood shutters are a worthwhile investment for any homeowner. With proper care and maintenance, they can render years of enjoyment and raise the overall comfort and style of your living space. Whether you re a mollify DIY enthusiast or a beginner, instal DIY wood shutters can be a rewarding projection that adds value and beauty to your home.
Related Terms:
- diy wooden shutters outside
- diy wood window shutters
- best wood for outdoor shutters
- diy wood shutters doi
- exterior wooden shutters
- diy exterior wood shutters